Friday, November 30, 2018

November 30th, 2018. Final Post!!!

So this month I started a comic series on Webtoon . It was a fun little project, and I learned and tried a lot of things in the process.

On the 1st...
-I researched the recommended sizing of a Webtoon, 160px by 151px per page with a max of 499kb of information
-I learned how to download and install new fonts to windows

On the 2nd...
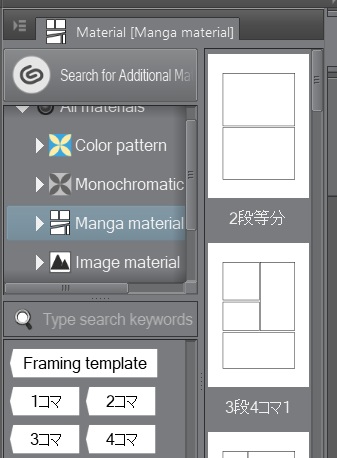
-I learned how Clip Studio Paint's asset downloader works and used it to download multiple new materials and tools
-I used said materials and tools to finish the first 2 pages of my comic

On the 5th...
-I realized that I had drawn the designs for the main cast in grade 8. So I decided to redraw the first 2 characters that would appear in the comic.
-I drew the 3rd page of the comic, shading it with tone layers and using the air brush tool to add depth.


On the 6th...
-I posted my first chapter to Webtoon and started chapter 2
-I explained how the comic panel tool works
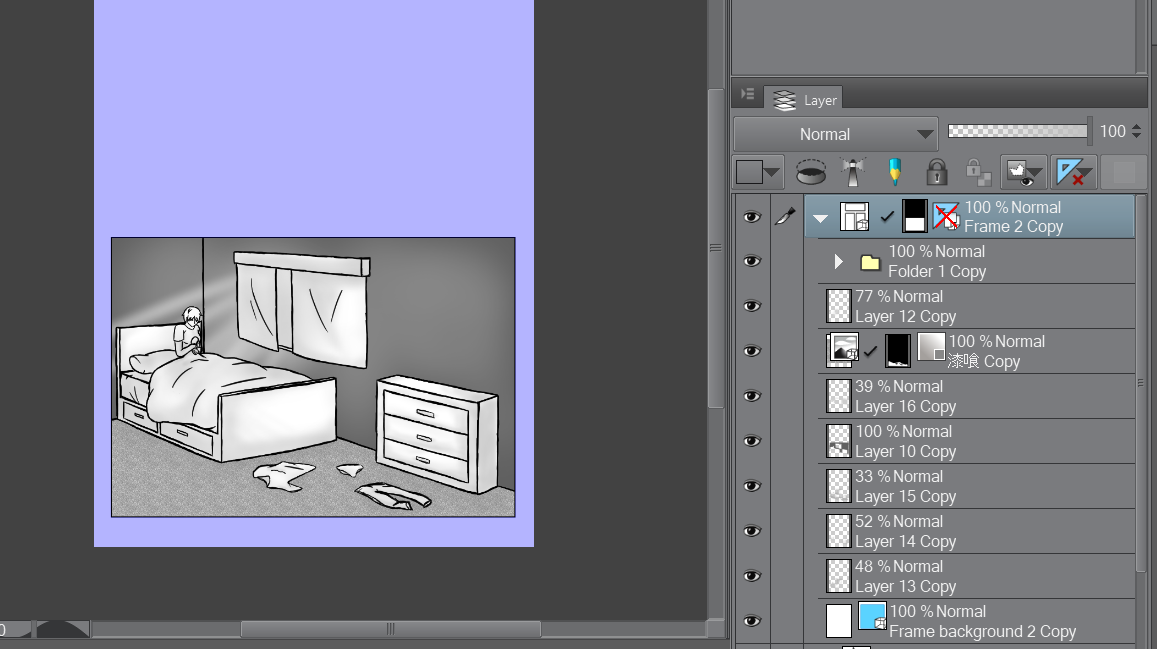
-I drew a distance view of the character in their room, using a texture for the carpet
-I shaded everything and used the airbrush tool to add depth again

On the 7th...
-I released the comics URL on the blog
-explained a bit about how the comic discovery system on Webtoon works
-I discovered, learned how to use, and explained the story function on Clip Studio Paint
-I worked on chapter 2 for a bit


On the 8th...
-I did a comparison of one of my rough sketches vs the final line art for it
-I found a cool short cut for the story function
-I found some cool selection settings when I right clicked a layer
-I finished one of the images
-I used empty panels to do a scene transition
-I sketched hands

On the 9th...
-I found some new settings for the mesh transform tool
-I decided to add another image of the character on page 2
-I moved the coffee cup image to page 3
-I finished the coffee cup

On the 13th...
-I started to work on the additional image for the second page
-I finished the additional image
-I downloaded another font

On the 14th...
-I explained the speech bubble tool
-I found reference images for perspective shots

On the 15th...
-I found more references images
-worked in my sketch book
-created a slideshow
-studied videos on exposition and cinematography

On the 16th...
-I finished my sketch in the sketch book
-I tried and failed to use Clip Studio Paint's rulers
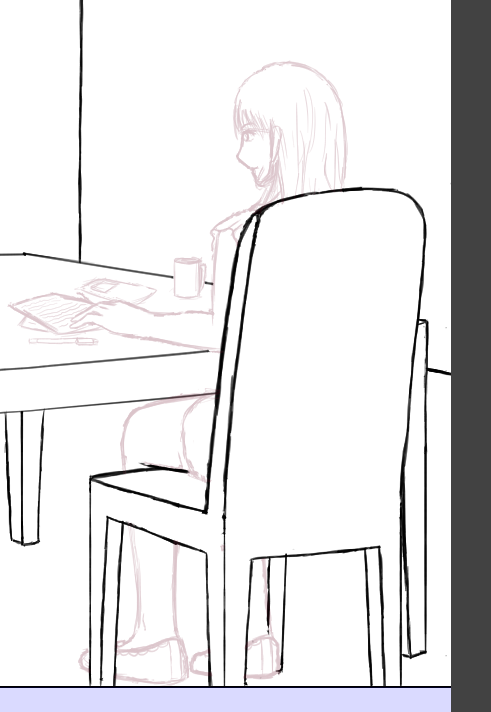
-I finished a rough sketch of the table and chairs on my computer

On the 19th...
-I couldn't draw due to my hands being shaky so I studied tropes in writing

On the 20th...
-Once again my hands were too shaky
-I used story planner to make character outlines

On the 21st...
-I drew and redrew the perspective multiple times
-I used 3D models to get the positions and sizing of the characters right

On the 22nd..
-I did the drawing for the rough anatomy of the characters
-I drew the rough sketch for the main character

On the 23rd..


Next month I want to work on concept art and world building as my focus. I'll be designing things like the look of the world, how the worlds magic system works, and culture. I'll be creating this world for a story me and some friends are making. My art work previously has had a more comic style so this will force me to learn more traditional styles of art. I'm also bound to learn a ton of things while researching world building.

Tuesday, November 27, 2018

November 27th, 2018. Project: Make A Webtoon

So since the next image will start this scenes dialog, I figured I should script it before hand. So that's what I'm working on currently. I'm just writing it on a random page from my notebook.

So I wrote the first version of the dialog, I was focusing on the content of the conversation. Because of that it doesn't flow very well so I'm going to go through it again. This time with the word flow in mind. With flow being it's naturalism, would a person actually speak this way.

I'm having one of the character's speak unnaturally for comedic effect. As well as to make them seem uncaring. I think I've made the other character sound good though. So now onto the drawing process again.

I'm currently working on the first sketch for this page. Since it's mostly close up shots with simpler perspectives it's easier to draw. This sketch took me around 15-20 minutes. I think I'll do the next image's rough sketch then stop for the day.

I finished the rough sketch for the next image.

Monday, November 26, 2018

November 26th, 2018. Project: Create A Webtoon

So Clip Studio Paint went through an update and I decided to try on of it's new functions while shading in the current panel. It's a preview for a function called colorizing. I have no clue how it works even after trying it. It did leave a cool effect though, I tried it on the painting. I don't know how to explain it. I've just put images of the effect and the original before colorization.

So aside from that little trial, I finished the shading and added depth for my current panel. Which makes it finished, that took a while. Hopefully the next page wont take as long as this one did. I also didn't like a bit of how the image was. So I made the masking layer a bit smaller, making the part I didn't like invisible.

I think I'll stop here for today, tomorrow I'll start on the next page.

Friday, November 23, 2018

November 23rd, 2018. Project: Make A Webtoon

So I've started the final lines for the main character and I still have to do the rough drawing for the other character. That's what I'll keep working on for now.

Like usual hands are hell to draw.This time I can use the coffee cup image as a reference layer. That's more convenient for sure.

I finished the final lines for the MC so now I'll be working on the rough sketch for the other character. I hadn't actually figured out how I wanted the character to look. So I just decided to go with a classically feminine business casual character. I figured that would work do to the fact that character is a social worker.
So I finished the rough design now I'm doing the fine lines. I had to readjust the size and position of the arms multiple times, that was a pain. I also had to search through my layers to find the final drawing of the chair and make it thinner. I finally finished the fine lines.

I want to add more to the background so I added a simple painting.

I'll shade and add depth tomorrow.


Thursday, November 22, 2018

November 22nd, 2018. Project: Make A Webtoon

So drawing anatomy is still difficult. I've been doing the rough character sketch and I have had to restart with the anatomy multiple times. That doesn't even include the amount of times I've resized things. For the main character I've managed to finally get the for right, but for the person she's talking to who is facing away I can't quite get it right. I'm going to go find some references for drawing characters from a back facing view.

I didn't find any references sadly, so I'm just going to keep redrawing it until I get it right.

I redrew it 5 times, that was annoying. I now have the base anatomy though. Now to draw the actual rough character sketch over that.

I did the rough sketch for the main character. I'm out of time for today so that's where I'll stop.

Wednesday, November 21, 2018

November 21st, 2018. Project: Make A Webtoon

Alright back to drawing today, I'm in hell trying to get this perspective write. Drawing chairs is HELL. I finally finished the sketch though, now I have to put people in these chairs. I'm going to try and pose 3D models and trace over them to do that.

Getting the models in place with the perspective was difficult, not impossible. I think with more practice it'll be easier to do. Now I just have to draw over the models.

I just finished that as well as did the final line work for the table.

I'm out of time for today so tomorrow I'll do the rough sketch of the characters as well as add more detail to the background.

Tuesday, November 20, 2018

November 20th, 2018. Project: Make A Webtoon

Sadly my hands are still shaking like a 9.8 on the Richtor scale, so once again no progress on the actual drawing process. I don't want to take notes on videos again so I'll be introducing the website I use to plan my stories:Story Planner. I bought a year long subscription for this website last Christmas and it was totally worth it.

I most of the time use it to layout general story outlines or to help me keep my character's consistent. Story Planner has a load of useful story layouts and planning assistants though.

Since I haven't gotten very far with my Webtoon I was going to wait a bit before creating character plans. I've decided I'll do that today, for at least the main character. My favorite character plan is the detailed character profile because of how detailed it is. The other templates are simpler, while they are quicker to do, the detailed character profile gets in depth.

I don't want to spoil anything from my story on this blog so I'm not going to say what I wrote. All I will say is I finished the character profile for the main character.

Monday, November 19, 2018

November 19th, 2018. Project: Make A Webtoon

My hands are extremely shaky so I haven't been able to draw today. I did not slack off however, I did research into writing tropes related to my story.

I watched a couple of videos, here are the notes I took for each...
-Usually starts with a change or an inciting incident
          -sometimes multiple connected incidents
          -or one major incident

-Most stories are about the MC (main character) coping with a new situation
-Lots of stories start by establishing a norm and then thrusting the MC out of it
-A good way to flush out a character is to put them in a new situation and see how they react
-It doesn't have to be a quick tear away from normal, you can do it slowly.
-Pace at the beginning sets the standard for the overall pace of the story
-Most suddenly give a teen magic stories start suddenly and keep that pace
-Some start slow though
-Harry Potter and The Philosopher's Stone starts off slow in pace for the reader, but from Harry's perspective his life is hectic
-These pacing standards are often subverted though
-Most authors are taught to, and I quote, "GRAB YOUR AUDIENCE BY THE EYEBALLS AND DON'T LET GO!! DO YOU WANT TO FADE INTO OBSCURITY?!!"
          -This is false

-You can use subtle tones or moods in the story to draw the reader in slowly
-A slow intro isn't bad

-Every character lends a certain strength to the party
-Together the characters can handle a number of situations that wouldn't be possible other wise
-Usually consists of...
          -The leader                                  -The lancer
          -The big guy                                -The smart guy
                                     -The heart

-The leader is usually the...
          -center of the team
          -common link between the characters
          -first or one of the first members of the group
          -MC
          -most well rounded of the group

-The lancer is usually the...
          -leaders foil
          -closest character to the leader
          -leader's rival
          -character used to question the leaders choices
          -character most likely to betray the group or go off on their own

-The heart is usually the...
          -emotional center of the group
          -love interest for the leader and or lancer
          -team member that keeps the group grounded
          -most emotional and compassionate
          -character that influences the group to be better
          -character with the most niche abilities

-The big guy is usually the...
          -power house of the group, either strong in offence, defense, or both
          -most loyal
          -character with a weird trait or ability

-The smart guy is usually the...
          -best character to use for exposition or relaying strategies
          -most likely to have a disability
          -character least suited for combat
          -most likely to be on the spectrum

-This is a very flexible trope
-Additional characters are common, such as the...
          -sixth ranger character
          -tag along kid character
          -mentor character

-These archetypes can be shuffled up or changed when necessary
-Five man bands often have elements assigned to each character
-Getting all the characters together can be difficult. Some common solutions for this are...
          -common origins
          -common enemy or separate but connected enemies
          -interpersonal motivations
          -having them meet in parts

-There are lots of possible character dynamics with this trope
-The power of friendship is commonly used


That's it for my post today, hopefully my hands will be functional tomorrow.

Friday, November 16, 2018

November 16th, 2018. Project: Create A Webtoon

Even though I did draw the table in my sketch book, getting it right in (I'm sick of typing the full name so I'm shortening it) CSP was still excessively difficult. I tried using some of the ruler tools (mostly the perspective and guide rulers) but I couldn't for the life of me figure them out. The perspective tool makes additional ruler lines and the guide tool doesn't lock correctly, and none of the rulers seem capable of movement so I can't readjust them.

I ended up spending most of my time failing to understand the rulers. I'll have to play around with them again some other time to figure them out. I'll probably google a tutorial later.

Drawing the table without the rulers was difficult but not impossible, the lines are less than steady though. I got the table and part of one of the chairs done, I'll do the other chair and the rough models of the characters tomorrow.

Thursday, November 15, 2018

November 15th, 2018. Project: Make A Webtoon


So I found some reference images on perspective drawing, I couldn't get it to work right by drawing in Clip Studio Paint so I decided to draw it in my sketch book first.

The scene I'm drawing in the next couple of pages is just a simple conversation over breakfast. To make it more interesting and less of an exposition dump I watched a couple of videos on how to set up a table scene. This one was the most useful.

So I've finished the sketch in my sketch book, so tomorrow I'll use that as a reference while drawing on my computer

     ⇧

Wednesday, November 14, 2018

November 14th, 2018. Project: Make A Webtoon

So now that I have the font I figured I would share how the text bubble tool works on clip studio paint. Basically you just click the tool, select what type of text bubble you want; You can also import new types from the materials window and down loader. For this part of the comic I wanted the bubble to be shaky so I chose the bubble pen and just drew a really shaky circle and tail. You can do bubbles in any color, it also offers customization in what tool the bubbles are drawn in, such as pen tools or airbrush tools. It's really simple to do.

Since page 2 is finished I'm moving on to page 3. Since the coffee cup image is finished I need to draw the far view of the 2 characters talking at a table. This is turning out to be very difficult to get right due to the perspective. I'm going to try and find some reference images.

I found some pretty good reference images on Pinterest, I've run out of time though so I'll continue tomorrow.

Tuesday, November 13, 2018

November 13th, 2018. Project: Make A Webtoon

So right back to work on page 2, I moved the coffee cup image to page 3 using the copy paste tools. I had a bit of trouble with this though. I could move the drawing itself but not the masking layer created by the comic frame border tool. With a bit of experimentation I found the solution. The move object tool, apparently. I still had to move both the image and mask layer separately though.


 I finished the lines and shading for the image, I want to add some text though. None of the fonts I have suit the character's feeling though, it ends up a goofy contrast to the character. So I'm going to the internet.

I found this site and font that I think will work so going to try and use that. I'm out of time for today though so I'll do that tomorrow.

Friday, November 9, 2018

November 9th, 2018. Project: Create A Webtoon

So back to the second image on page 2. I did the line work pretty easily, I had to use the mesh transformation tool on the arms. I found something new while using it. If you have the tool settings panel open while using it, you can increase the number of points you can manipulate in the mesh.

I don't really like how suddenly we move away from the first story scene so I'm moving the cup image to page 3 using copy and paste, and I'll be drawing another image of the character. I've done the base sketch already. I've run out of time to work today so I'll continue on that tomorrow.

Thursday, November 8, 2018

November 8th, 2018. Project: Make A Webtoon

Alright continuing page 2... I just want to quickly compare my sketch vs the final line art because I am impressed with how it develops.

I found the short cut for opening a selected story page in a new tab: N, it's the N key. I also found a new selection thing while experimenting with the layers. You right click a layer, go to the selection button, and you can create a selection from the layers contents as well as add to that selection with another layers contents, it's super useful.

I finished the shading on the first panel and I'm still deciding whether I want to add another image to this page.

I decided to do a panel transition, which is a transition between scenes using multiple small empty panels. I also chose to start the next scene with a zoom in on the main characters hands on a coffee cup. On the next page I'll do a far view of the character eating breakfast. I'm really happy with how the sketch of the hands are turning out. They are still really difficult to draw, I'm getting better though.

I think this is where I'll stop for today


Wednesday, November 7, 2018

November 7th, 2018. Project: Make A Webtoon

So I just realized that I actually haven't said the name of the story or posted the URL to the blog.  So here is that... https://www.webtoons.com/en/challenge/magical-recovery-project/list?title_no=238113 . My story currently has 3 subs and 14 views, which is awesome considering it was just posted yesterday. Webtoon only features series that are already popular on their home page, so for my story to be found it would have to either be specifically searched or one of the keywords related to the story would have to be searched. The search bar on the site will pull up all stories related to what's typed in.


While working with the story I found this cool function of Clip Studio Paint. I can take a page file and make it into an actual story. With that I can add pages that are automatically the same size as all the others; I can go between linked pages, and when a story is saved or opened it does it with every linked file, you can access them separately though. With this I don't have to open and close and reopen the pages to edit them. I just click the page I want then click open page in a new tab. It will show both the entire story, and the page your working with at the same time.

So onto my work with Chapter 2 Page 2, I've done a rough sketch and now I'm working on the details. And I just accidentally discovered a new thing with the story functions, I can drag and drop pages into different orders. I made the character's arm a bit too big so I had to resize that, as well as the annoyance of drawing hands. I finished the line work for page 2, all that's left is the shading.

I noticed today my drawing tablet cord is getting a bit worn down so that might cause problems in the future...

Tuesday, November 6, 2018

November 6th, 2018. Project: Make A Webtoon

So I decided to post the first chapter with the 4 already created pages, so I'm starting page 1 of Chapter 2.

I didn't blog about it last time, but I'm doing the same thing now as I did with the last chapter so now's a good time to write about it. For the images in the comic I'm using Clip Studio Paint's specialized comic panel creation tools. Using these I can either create my own custom panels, which also act as masking layers to anything outside the selected space. Or use pre-made comic pages from the material area. For my webtoon I decided to create my own image panels because this was more suited to the style of webtoons. I experimented with both though.
The pre-made ones were simple to use, you just select the one you want and then drag it onto the project. then you select the image folder you want to use and draw on layers inside it. since it works as a layer mask anything drawn out side of the panel lines won't appear.

With the custom image panels you can basically create panels of any shape that are automatically layer masks. then using other tools you can edit them further. So far I've just used it to create rectangular panels.

For page 1 I wanted to show a distance view of the character before I plan to zoom in on them in page 2. Drawing the room was a little more difficult than I expected, with the perspective as well as the room's coloring and lighting being the hardest parts. I had to create 3 sketches before doing the final line art. I used a downloaded texture for the ground, giving it a carpet appearance. To use the texture I just used the selection tool to specify the area I wanted effected. Then just dragged and dropped the texture from the material palette. Finally I adjusted the color settings and it was finished.

For the rooms lighting I just used the air brush tool again then messed with some of the layers opacity.

Tomorrow I'll work on page 2.


Monday, November 5, 2018

November 5th, 2018. Project: Make A Webtoon

So I started the third page and realized that the reference image for the main cast of characters was drawn in my grade eight year. They look terrible, so I had to redraw them, that took some time. Too much time actually so I settled for redrawing the first 2 who would be appearing in the comic. The first one was easy but on the second one I got caught on drawing the hand, hands are the worst to draw. I did it though, just a sketch of the characters.

Once I finished that I started on the third page. Firstly I did a rough sketch. Then I did another sketch, I did a fine line version next. After that I decided to try something new, for the first bit of the story I want everything to be in black and white. I've never done this before, I had a couple of options to fill the empty space. I ended up deciding to use tone layers to do the "colour" for the first chapter. This works by right clicking the layers, creating a tone layer, and adjusting the settings. I also used a selection layer to specify the tone location. Up close it just looks like a bunch of black blocks, at a distance it looks like a grey.

I also used the air brush tool to add depth and eye bags.

I started to upload the pages to Webtoon in a project draft, when I previewed it though I realized the start was a bit too sudden. So I added another page at the beginning, just black with the chapter title.

That's all I have time for today, tomorrow I'll add another image to the fourth page.

Friday, November 2, 2018

November 2nd, 2018. Project: Make A Webtoon

So I'll be working on the background for the page and the pages drawing.

Starting with the background, since this first chapter is in a nightmare I want it to have a creepy feel to it so I'll be trying a new tool I downloaded. I downloaded it through Clip Studio's asset store, to download stuff you need to open the separate program that comes with Clip Studio Paint, Clip Studio. Once open you just click on the asset store button, then the asset you want, and click download. It's super simple, I tend to find way too many cool assets using this. For brushes you go to the materials panel in Clip Studio Paint and drag the material to you brush panel then it's ready for use. I'm using a brush that does a gradient thickness crosshatch design.

I think for now since it's the beginning of the story I don't want the details of what happened to the main characters family to be obvious. So for the dream part it will just be text for now.

With that said I finished the first 2 pages so I'll be drawing page 3 next time.

Thursday, November 1, 2018

November 1st, 2018. Project: Create A Webtoon

So this month I'm creating a comic and I'll be posting it to Webtoon. Webtoon is a comic uploading site, it's completely free to use. When Posting a comic I'll be using the recommended sizing of 160px by 151px per page with a max of 499kb of information.

I've never actually created a comic before so I have no clue what I'll be doing till I do it. So I'll be starting page one today.

To start with I created a rough sketch of the first panel. I want this first chapter to be the main character's nightmare, I don't want the readers to know everything about them though so I'll be leaving key things out. I'm trying to give it a fragmented feeling, to increase curiosity.

For one of the parts I need a more frightening text so I'm going to try downloading a new font to Clip Studio Paint.

Okay made a discovery, though I did learn how to find and download new assets though Clip Studio Paint's asset menu, they didn't have any fonts. So I went to the internet and found out that (site link here) Clip Studio Paint takes fonts from the available fonts in windows. So I downloaded the font I wanted (font site here)...

... and tranfered it to the windows fonts folder with help from my teacher. I restarted Clip Studio Paint and when I reopened it it was there.

So I used that to write the text.

That's where I'll stop today, Tomorrow I'll add the page background and start the drawing.